BOM Manager
The BOM Manager lets you define Bills of Material for any given Work Order, validate the data, and optionally submit it to a third-party purchasing system such as SAP.
Accessed from:

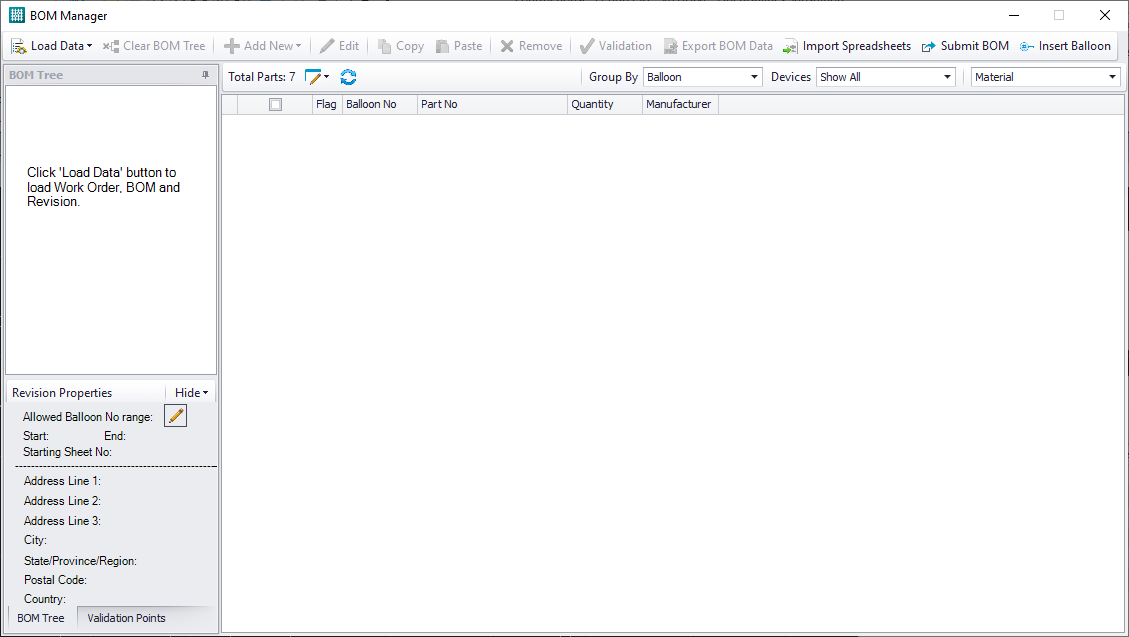
Load Data
- By BOM Document: Loads data into the tree by selecting BOM documents from the Load BOM Data by Document dialog.
- By Work Order: Loads data into the tree by selecting Work Orders from the Load Work Order(s) dialog.

BOM Tree
 : Click the node to list the
parts/devices associated with the Work Order.
: Click the node to list the
parts/devices associated with the Work Order.
 : Click the node to display the
parts/devices associated with the BOM document.
: Click the node to display the
parts/devices associated with the BOM document.
 : Click the node to list the
parts/devices associated with the Revision.
: Click the node to list the
parts/devices associated with the Revision.
Any node labeled "Unassigned Items" lists parts/devices which have not yet been assigned to a Work Order, BOM Document or Revision. These items can be assigned by selecting one or more items and dragging them to the desired location. The Select All check box at the top of the column will select all items which can be dragged onto the desired node:
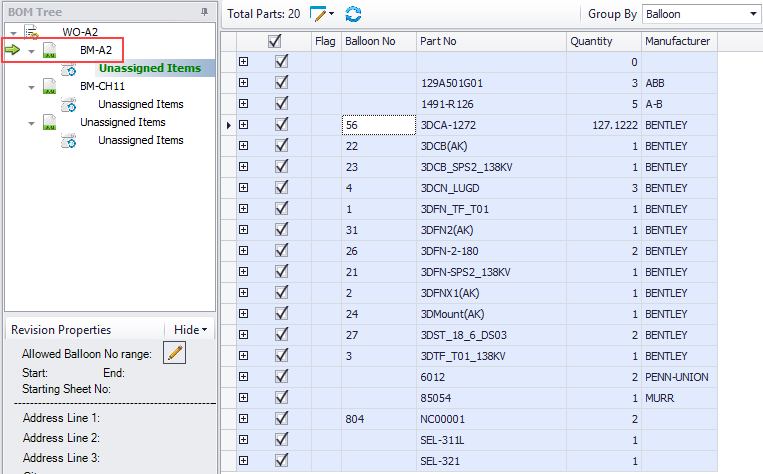
Data Grid
The parts and devices associated with the selected node in the BOM Tree are listed in a parent / child data structure.
 - Indicates the record represents
a primary part number if a device has multiple part numbers assigned to it.
- Indicates the record represents
a primary part number if a device has multiple part numbers assigned to it.
 - Indicates no symbol has been
placed in the project for this part.
- Indicates no symbol has been
placed in the project for this part.
Revision Properties
| Setting | Description |
|---|---|
| Allowed Balloon no range | Displays the 'Start' and 'End' values which define a range of balloon numbers that you want to allow for the revision. This is useful to ensure that when you are adding new entries to an existing BOM document that you do not accidentally reuse a previously taken balloon number. The BOM Manager will alert you if you attempt to enter a balloon number for a new part that is outside the specified range for this revision. |
| Starting Sheet No | Displays the starting page number of the bill of Material document that you want to add new entries to. This is useful if you have existing BOM documents and you want to add new items to the end of the existing document. You can define a BOM report template to use this starting number as the first page number of the report you generate. You could then merge the resulting report with your existing report to ensure that the page numbering flows properly. |
| Address | Optional fields which display the site address where the materials are to be shipped. |
| Edit Revision Properties | Select this button to display the Edit Properties dialog where you can edit properties for the selected revision. |
Toolbar Options
| Setting | Description |
|---|---|
| Load Data | Displays the Load Work Order(s) dialog letting you load the work order(s) which have been created for the project. |
| Clear BOM Tree | This option clears the items from the BOM Tree area of the dialog. Note the information is not deleted but simply removed from the tree. |
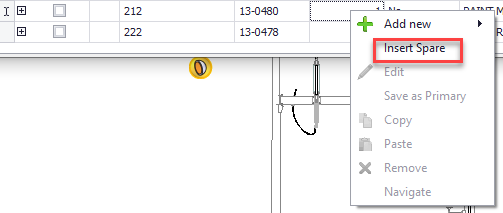
| Add New | This flyout button is context sensitive and will
enable or disable commands depending upon what you have set focus to in the BOM
Manager. The following commands are found here:
|
| Edit | You can select one or more part records and choose select Edit to display the Edit dialog. |
| Copy/Paste | Select the records you want to copy and click the Copy button to add the objects to the clipboard. Select the destination Work Order, BOM Document, and Revision in the BOM Tree and then choose the Paste button to copy the records. The device IDs will automatically increment to avoid duplication as required. |
| Remove | Select the records you want to remove and click the Remove button to effectively delete them from the project. You are not allowed, however, to remove devices that have symbols placed in the project. |
| Validation | You can perform various validation checks on the data in the BOM Manager for any given Work Order, BOM Document, and Revision to ensure that your data does not violate common design practices. Select this option to display the Validation dialog where you can toggle on the specific checks that are relevant to your organization to perform those validation checks. The checks are organized into categories making it convenient to toggle on or off all checks within a given category. |
| Export BOM Data | Exports the BOM data found in the selected Work Order, BOM Document, and Revision that you have selected in the BOM Tree to a CSV file. |
| Import Spreadsheets | Select this option to display the Open Excel dialog
where you can select which Excel files to import.
Refer to the Import a Spreadsheet topic for details on how to import spreadsheets. |
| Submit BOM | Selecting this button displays the
Submit BOM dialog letting you submit the BOMs for the
selected work order to a third-party purchasing system such as SAP.
By default, the software converts the BOM data into a JSON file which it then sends it to the specified URL. However, this functionality will need to be configured operate within the specifications of whatever system an organization uses to manage their work orders. |
| Insert Balloon | This option lets you insert balloons for the
selected devices into the drawing. Multiple devices can be selected
simultaneously and the balloons will be placed in order. If a device has
multiple instances in the drawing, you will be prompted to place a balloon for
each instance. Once all instances of one device have been placed, then the
balloon for the next device will be placed and continue until the balloons for
all selected devices are placed.
Because the balloons are associated with a device and not a specific symbol, you are able to place the balloons anywhere in the drawing. The balloons can be repositioned after placement if desired using the Move command. |